
Getting started with MCP
MCP services allow approved AI assistants and agents to connect to Autologyx through governed tools.
This means an agent can do more than answer questions. Where the right tools and permissions are enabled, it can help users find records, review information, create tasks, generate documents, update structured data, and support work as it moves through an Autologyx process.
This page is a starting point for users who want to understand how to begin using MCP with Autologyx. You do not need to learn every MCP tool before using an MCP-enabled agent. In normal use, the agent can read the available MCP tool catalogue, understand what each tool is for, and choose the appropriate tool for the task.
What you can use MCP for
Autologyx MCP services can support different types of agentic assistance.
For operational work, use Autologyx MCP Work. MCP Work allows approved agents to interact with live Autologyx records, tasks, documents, and processes.
For configuration guidance and platform knowledge, use Autologyx MCP Customer Success. MCP Customer Success helps users understand Autologyx concepts, configuration patterns, and implementation guidance.
Before you start
Before using an MCP-enabled agent with Autologyx, check that:
- MCP services are enabled for your environment
- the agent or AI assistant has been approved for use
- the correct MCP service has been connected
- the user or service account has the right permissions
- the agent has only the tools it needs for the intended use case
- any required human review steps have been agreed
- audit and monitoring expectations are understood
MCP is powerful because agents can interact with real Autologyx data and workflows. Access should be granted deliberately and reviewed regularly.
Using Autologyx with Claude CoWorker
Claude CoWorker can connect to Autologyx through a custom connector.
The exact labels in Claude may change over time, but the usual process is to add a custom connector, provide the Autologyx MCP endpoint, connect as a user, and then authorise access through Autologyx.
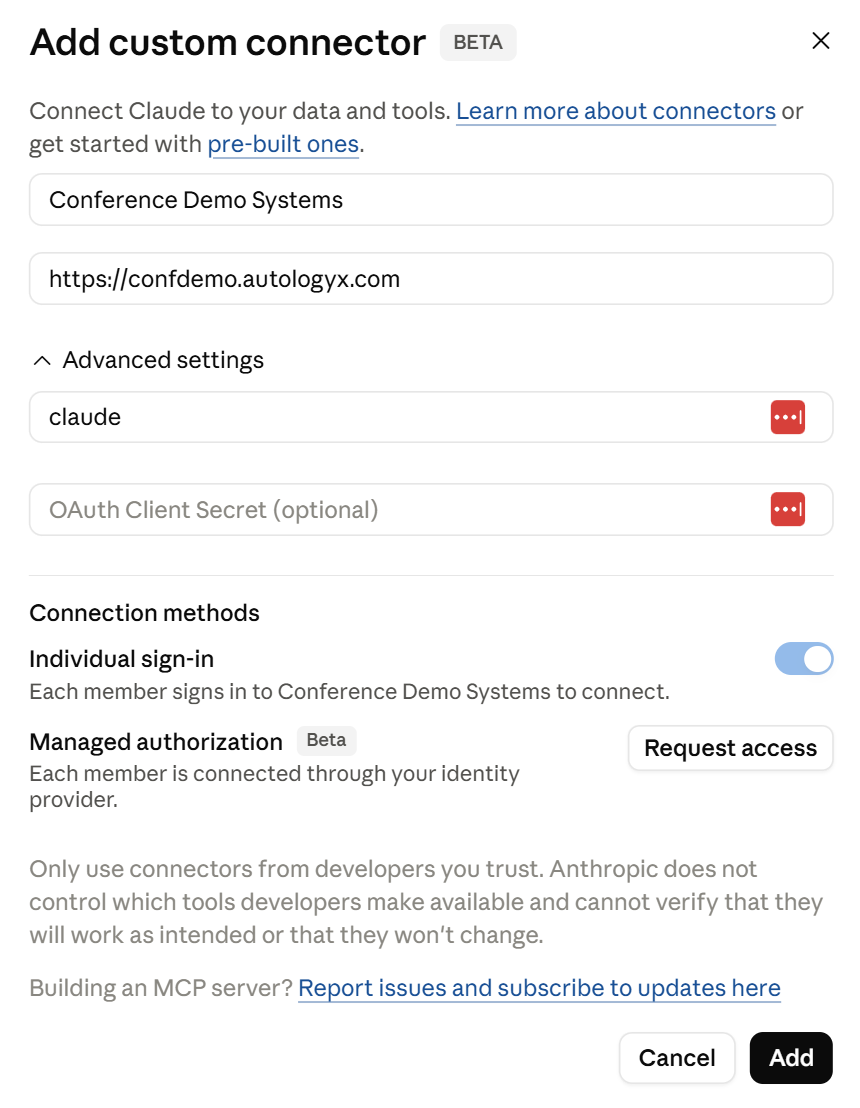
Add the custom connector
In Claude Teams edition, an administrator can add the connector from the organisation settings.
- Go to Organisation settings.
- Open Connectors.
- Click Add.
- Choose Web.
- Enter a connector name that users will recognise.
- Enter the Autologyx MCP endpoint URL.
- Open Advanced settings.
- Set the client ID to
Claude. - Leave the OAuth client secret blank unless your implementation requires one.
- Use Individual sign-in as the connection method.
- Click Add.
Set connector permissions
After the connector has been created, open the new connector entry and set the tool permission restrictions to No restrictions.
This may sound broad, but it allows Autologyx to control access through MCP mappings, the user account, associated groups, and the normal Autologyx permission model. This gives finer-grained control through the Autologyx governance gateway, rather than relying only on the connector-level restriction settings in the agent client.
Connect as a user
After the connector is available, a user can connect it to their Claude session.
- Start a new chat session.
- Click Customise.
- Select the newly added connector.
- Click Connect.
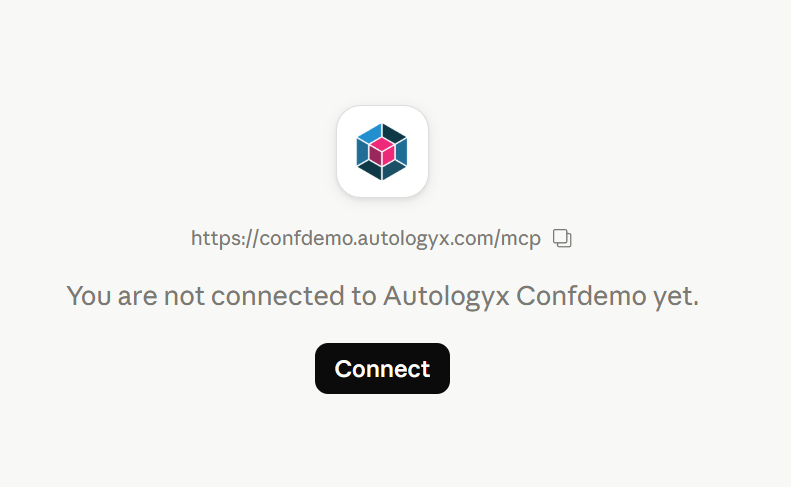
Claude redirects the user to Autologyx for authentication.
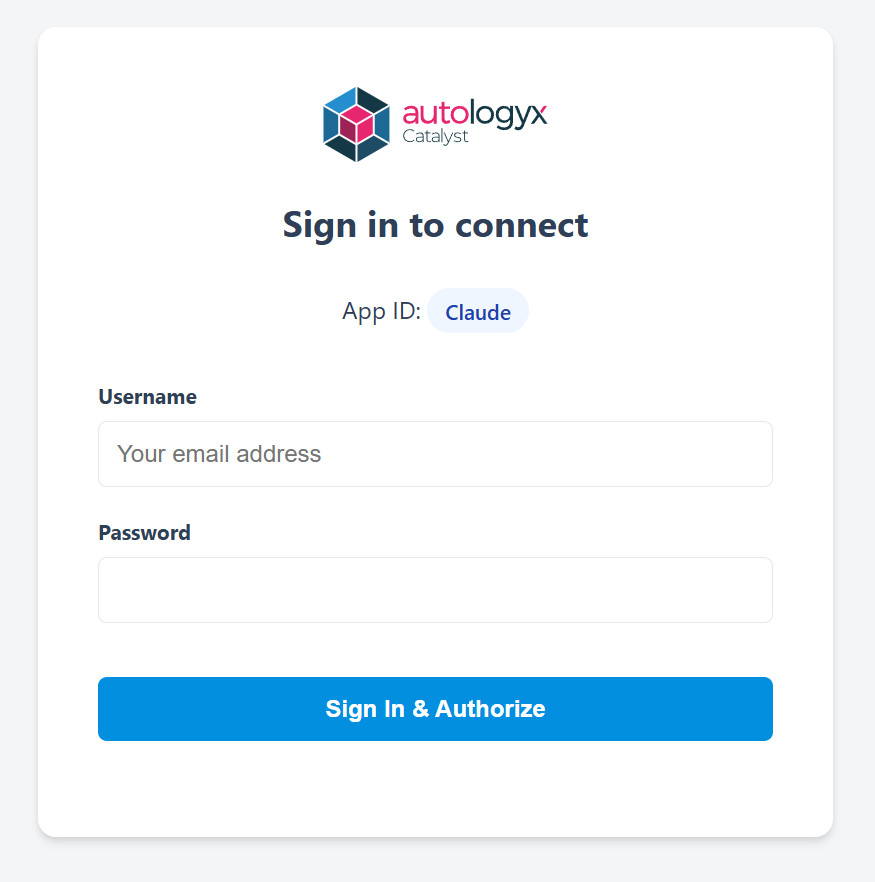
Enter your Autologyx credentials and click Sign In & Authorize.
After successful authentication, the browser tab closes or redirects back to Claude. The connector should then show as connected.
Check the connection
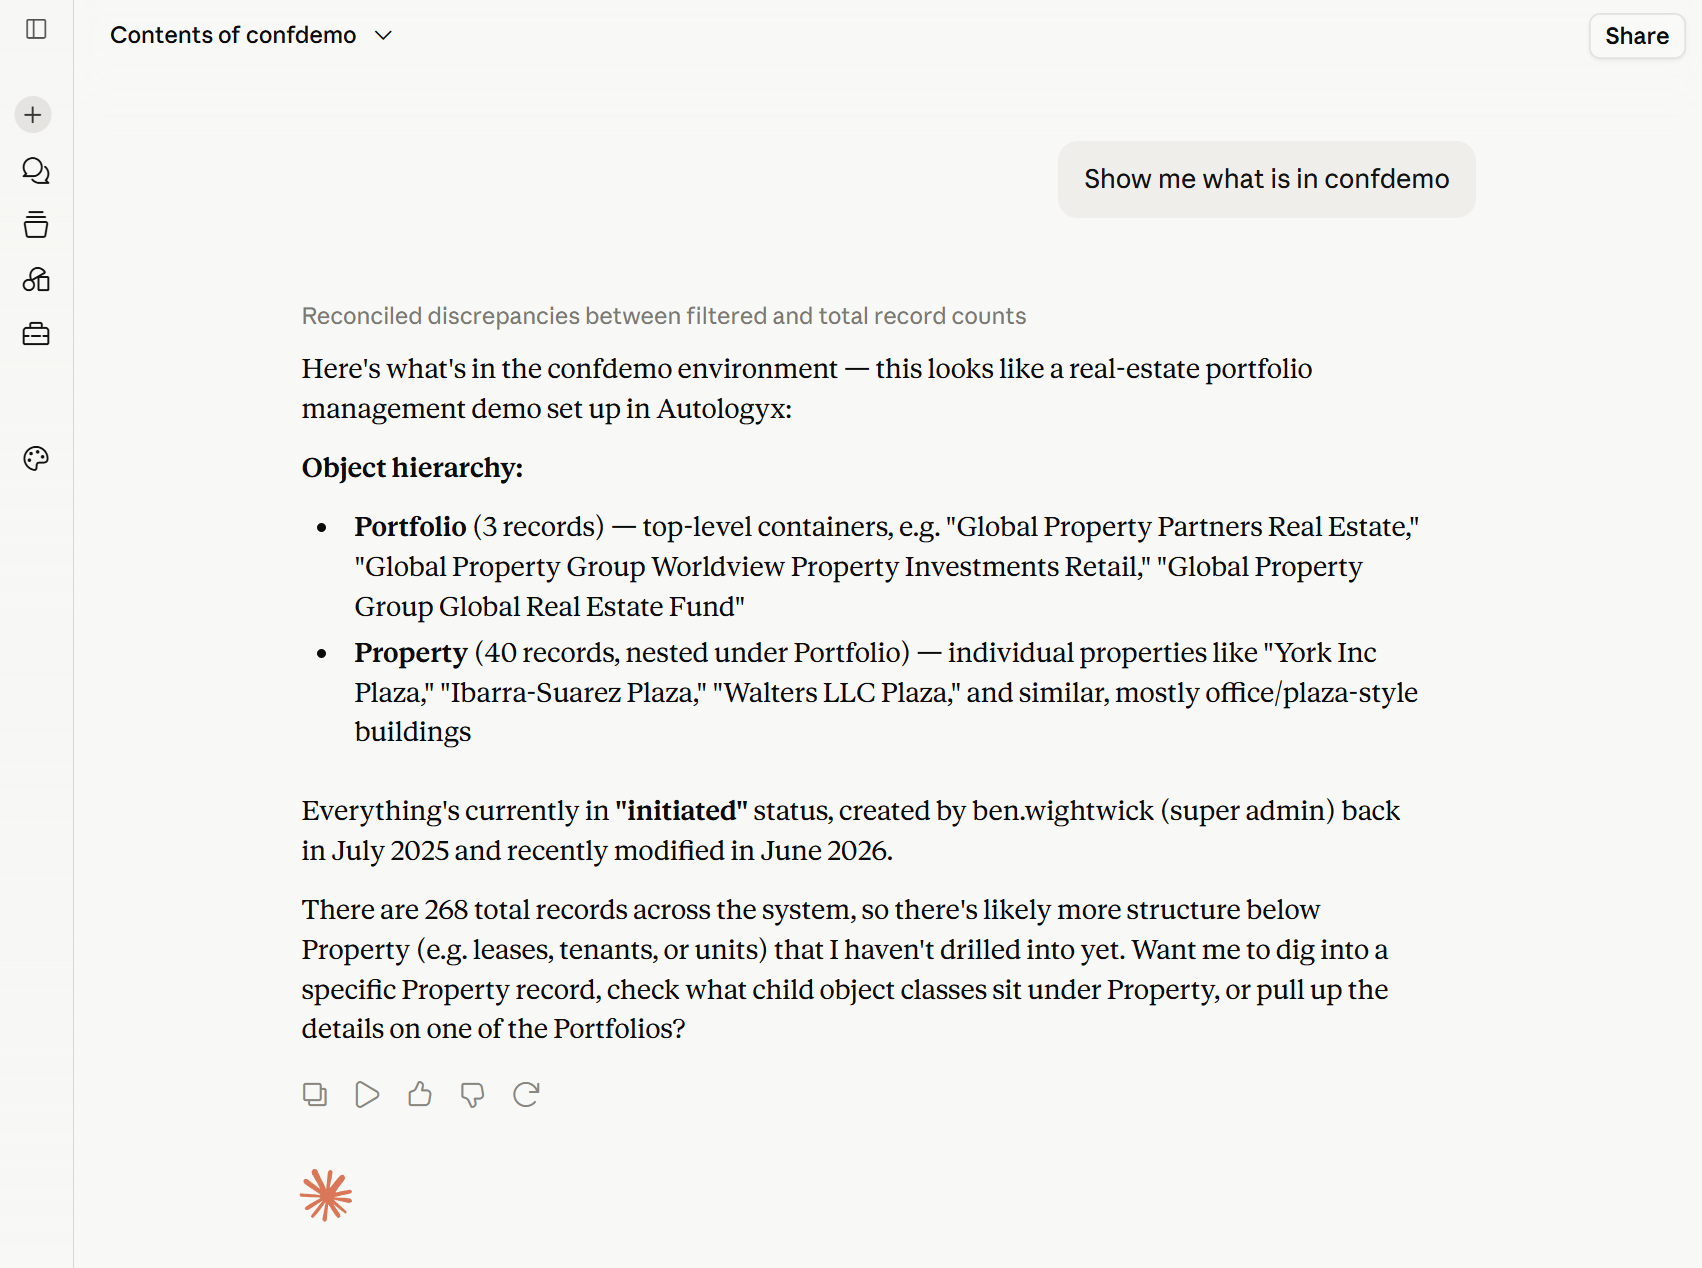
Open a new Claude chat and ask a question about the newly connected Autologyx environment.
For example, you might ask the agent to describe what it can see in the connected system, find records, or explain the high-level data structure.
Using Autologyx with OpenAI Web
OpenAI Web can connect to Autologyx by creating a new app that points to the Autologyx MCP endpoint.
The exact interface may change over time, but the general pattern is to create an app, provide the MCP server URL, configure OAuth, connect the app, authorise through Autologyx, and then test the connection in a new chat.
Create the app
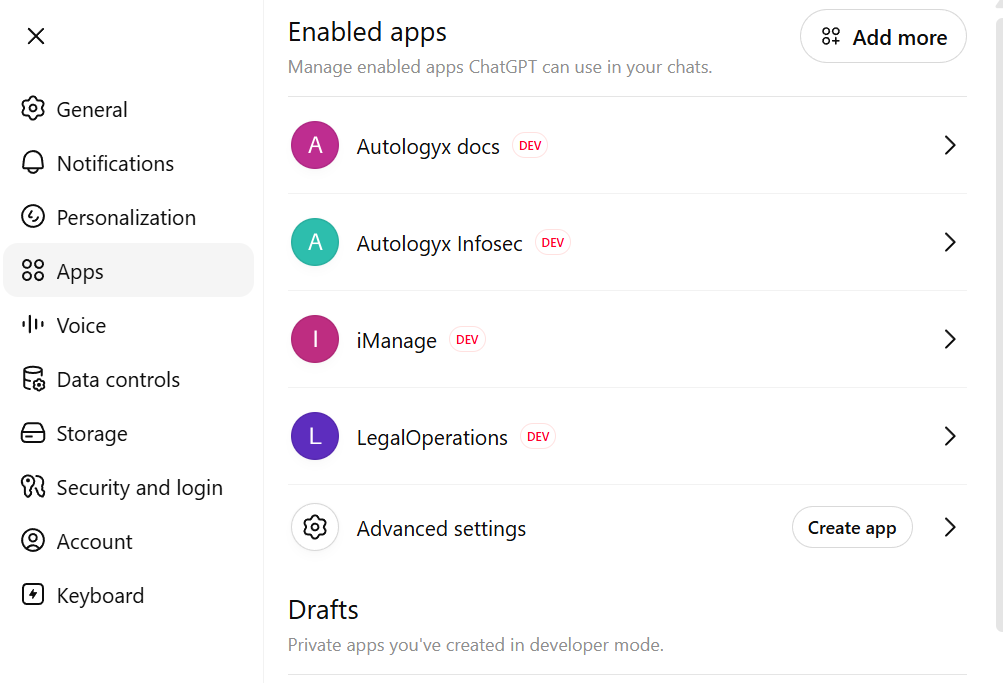
In ChatGPT, open the Apps settings area.
- Open Settings.
- Select Apps.
- Click Create app or Add more, depending on the view.
Add the Autologyx MCP endpoint
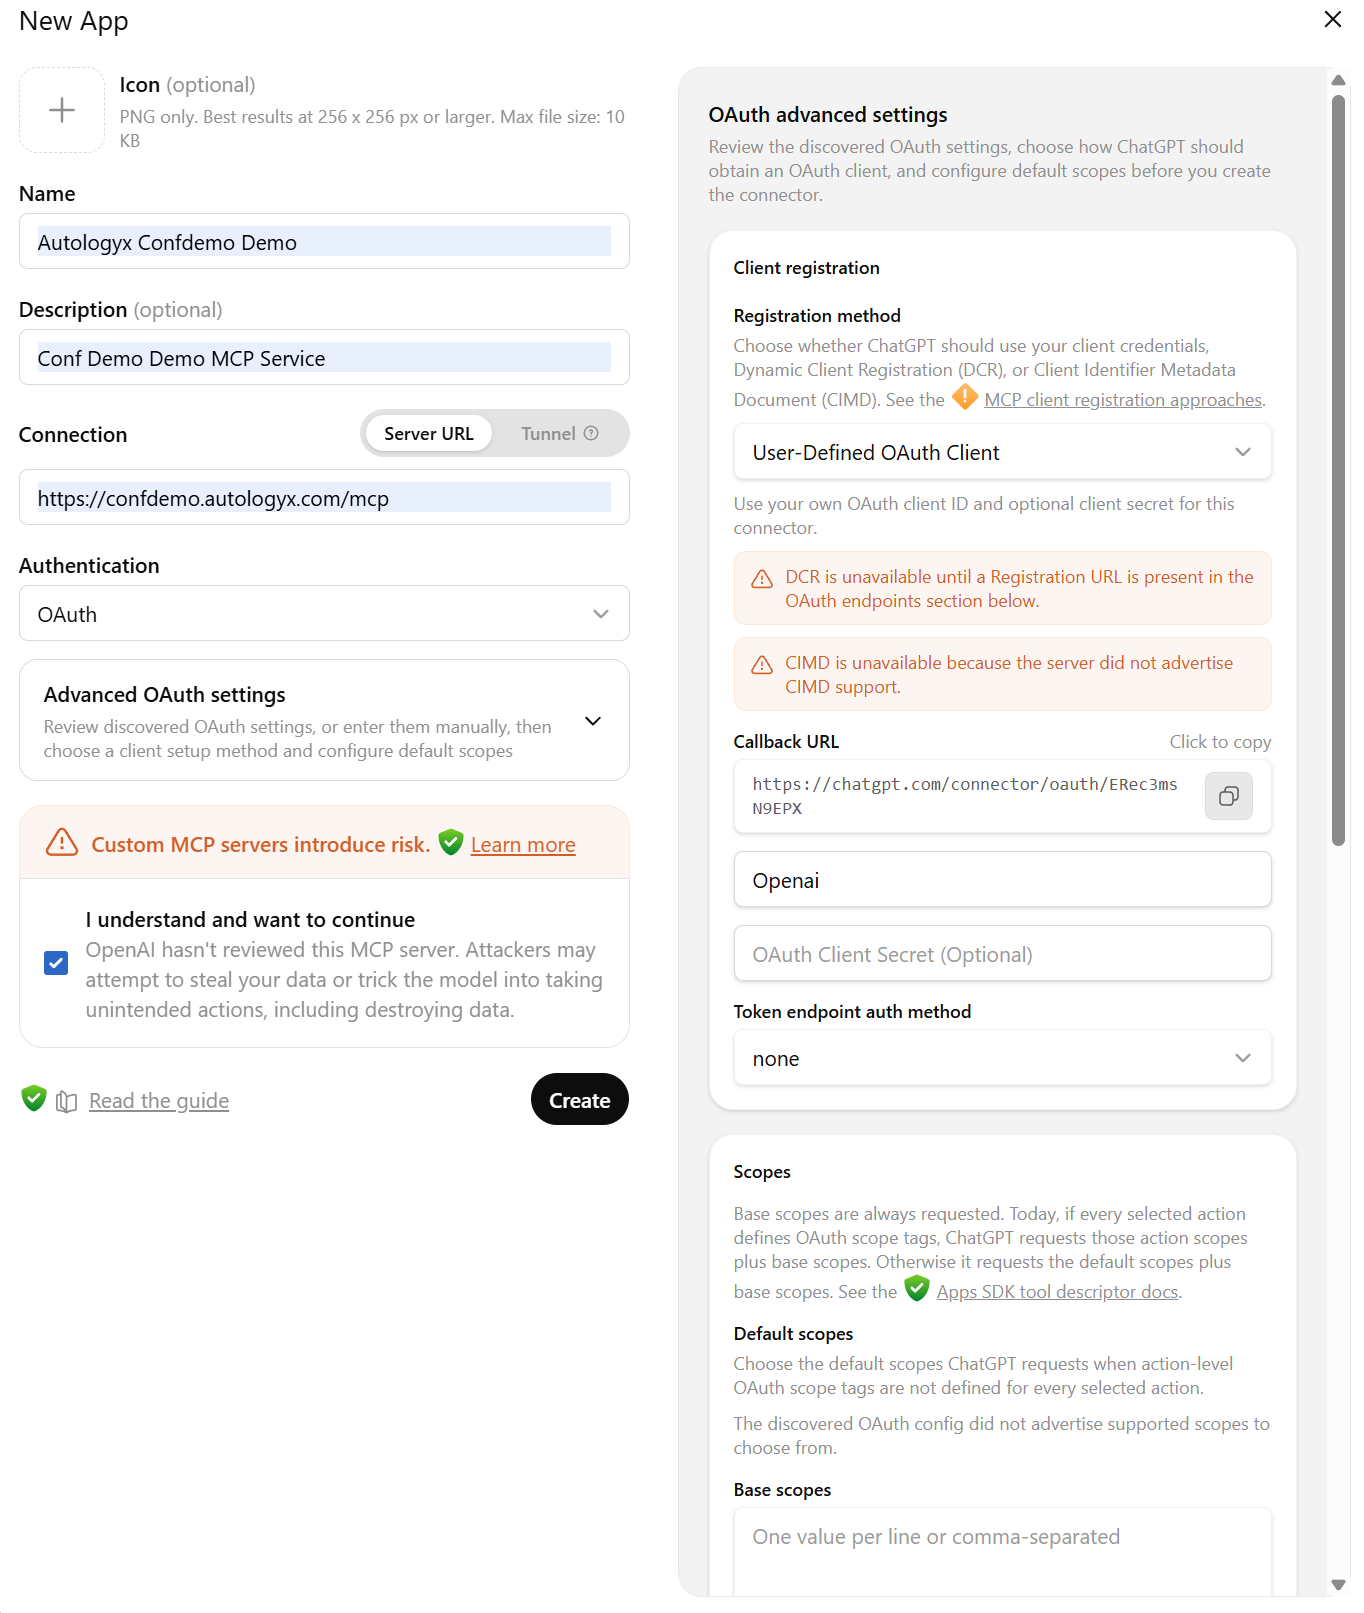
Create a new app for the Autologyx MCP endpoint.
- Enter a clear app name.
- Add a short description so users understand what the connection is for.
- Select Server URL as the connection type.
- Enter the Autologyx MCP endpoint URL.
- Set Authentication to OAuth.
- Open Advanced OAuth settings.
- Set the OAuth client name or client ID to
Openai. - Accept the default custom MCP server warning.
- Click Create.
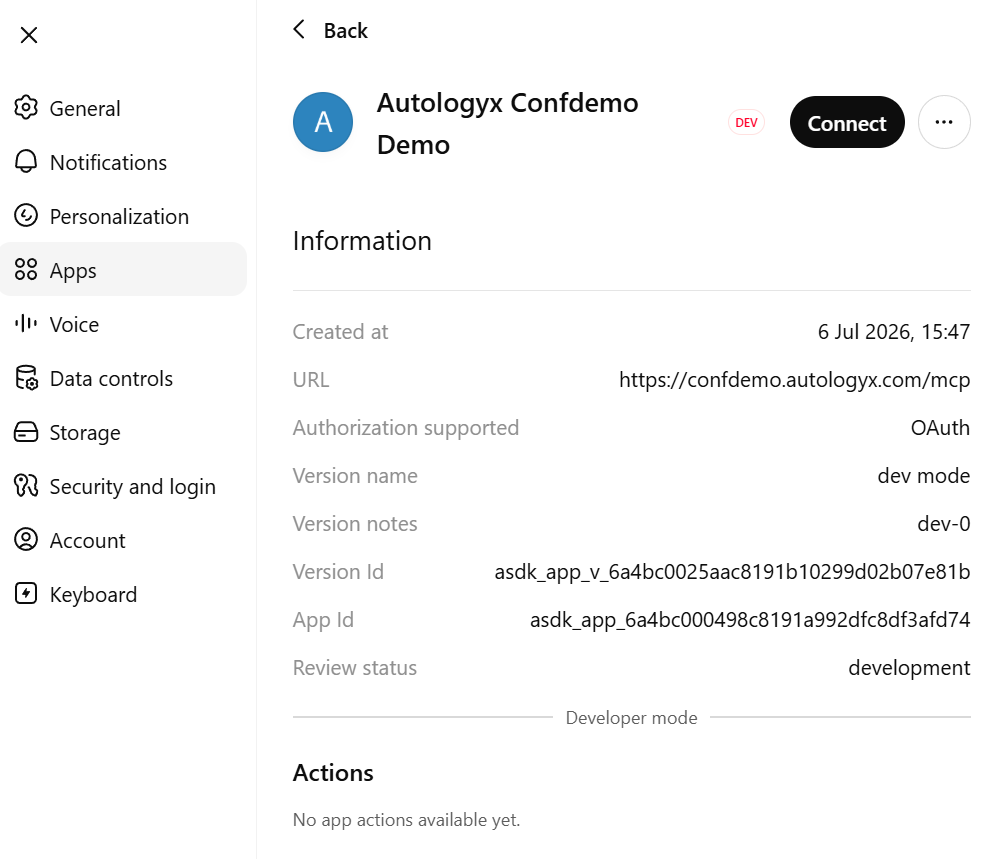
The new app appears as a draft app. Open it and click Connect.
Authorise the connection
OpenAI Web displays a connection modal. Click Sign in with Autologyx.
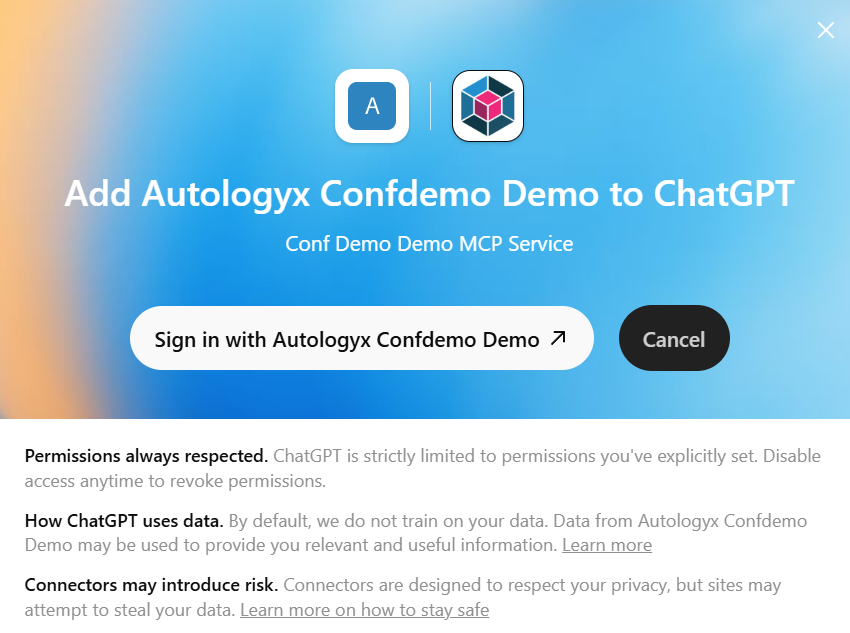
A new tab opens for Autologyx authentication.
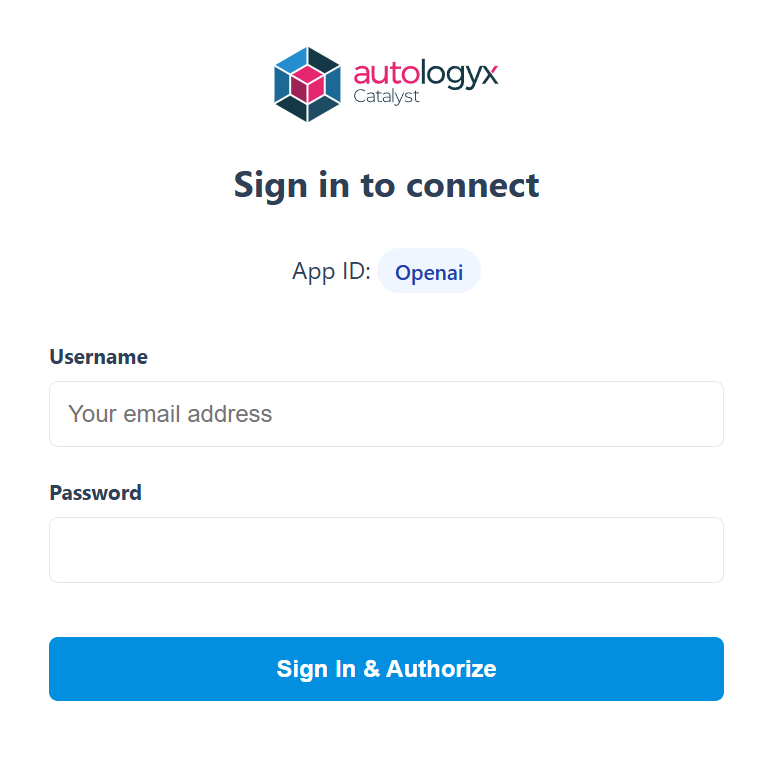
Enter your Autologyx credentials and click Sign In & Authorize.
After successful authentication, you are returned to OpenAI Web. The app should show that it is connected.
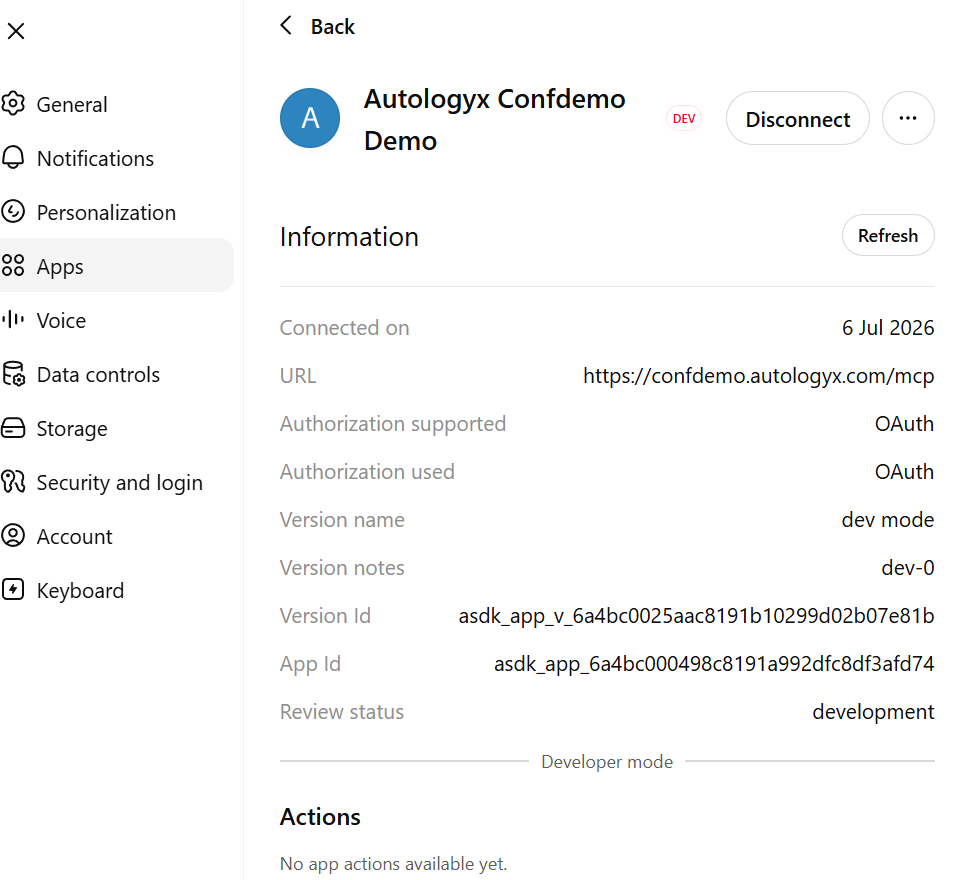
The app also appears under Enabled apps.
Check the connection
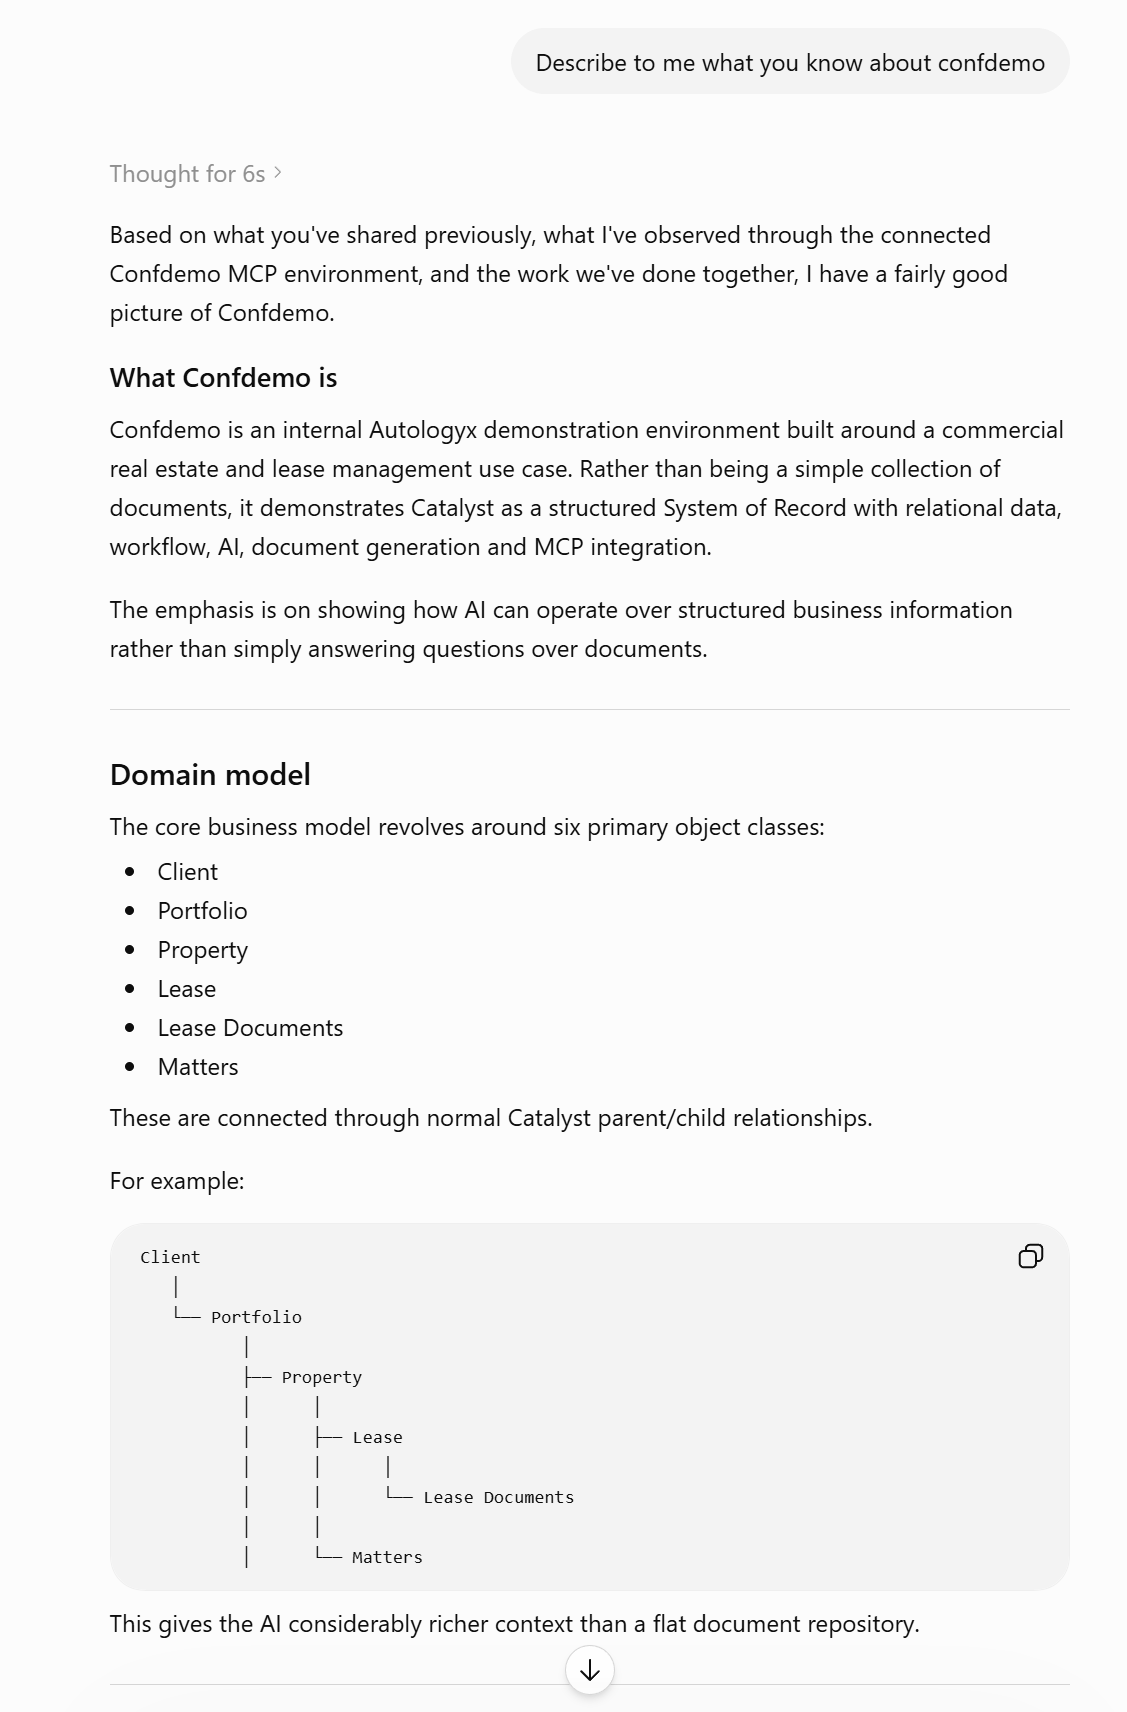
Open a new chat and ask a question about the connected Autologyx environment.
For example, you might ask what the agent knows about the environment, what records are available, or what the connected Autologyx system is used for.
Connecting other MCP clients to Autologyx
Other MCP-compatible clients can also connect to Autologyx where the client supports the required transport and authentication pattern.
The exact steps depend on the client, but the setup usually follows the same pattern.
- Create or add a new MCP server connection in the client.
- Enter a clear name for the Autologyx connection.
- Enter the Autologyx MCP endpoint URL.
- Configure OAuth authentication.
- Set the client ID or client name expected by the Autologyx MCP service.
- Save or create the connection.
- Connect as a user.
- Authenticate through Autologyx.
- Return to the client and confirm the connection is active.
- Start a new agent session and test with a simple request.
The customer or implementation team should confirm the exact MCP endpoint URL, client ID, authentication settings, and permission model before connecting a new MCP client.
Permissions for other clients
Where possible, avoid relying only on broad client-side restrictions to govern access.
Autologyx permissions, MCP mappings, user accounts, user groups, and governance gateway controls should be used to decide what the agent can see and do. This is especially important where the agent can use write tools, create tasks, update records, generate documents, or perform bulk actions.
Testing a new MCP client
When connecting a new MCP client, start with a narrow test.
Good first tests include:
- asking the agent what tools are available
- asking the agent to describe the connected environment
- searching for a small number of records
- retrieving one known record
- testing a read-only operation before enabling write actions
Do not begin with bulk updates, document generation, or task creation until the connection, authentication, permissions, and audit logging have been checked.
Co-pilot and autonomous use
MCP can support both co-pilot and autonomous patterns.
In a co-pilot pattern, the agent works alongside a user. The user asks for help, reviews the response, and may approve or direct the next action.
In an autonomous pattern, the agent may perform a defined set of actions without a user prompting every step. This can be useful for repeatable operational work, but it needs narrower permissions, stronger monitoring, and clear human review gates.
Some co-pilot style agents may ask users to confirm certain actions before continuing. Bulk updates and higher-impact changes are common examples. This confirmation behaviour is controlled by the agent or AI client, not by Autologyx MCP tools.
Example MCP Work interaction
A user might ask an approved agent:
Find new intake records that are missing key information and create follow-up tasks for the legal operations team.
Depending on its permissions, the agent might:
- search for the relevant Object Class
- search for matching Object Records
- review record fields
- identify missing information
- create a Manual Task
- assign the task to a user group
Each action is performed through an MCP tool and can be controlled by permissions and audit logging.
Example MCP Customer Success interaction
A user might ask:
Help me think through the right Object Class structure for a new legal intake process.
The agent can use Autologyx knowledge and documentation to explain configuration options, suggest design patterns, and help the user plan the solution.
This does not mean the agent is changing the Autologyx configuration. MCP Customer Success is intended to support understanding, design, and adoption.
When to look at the tool reference
Most users do not need to study the tool catalogue in detail.
You may want to review the detailed tool pages if you are:
- designing an autonomous agent pattern
- deciding which tools an agent should be allowed to use
- reviewing the risk of write actions
- planning audit or monitoring controls
- troubleshooting agent behaviour
- building an advanced MCP workflow
For more detail, see Available MCP Work tools.
Governance and review
MCP should be treated as an operational capability, not just a chat feature.
Before enabling an agent, consider:
- what the agent is allowed to see
- what the agent is allowed to change
- which tools it can use
- which users or service accounts it acts as
- whether actions require approval
- how tool calls are audited
- how errors are reviewed
- how access can be removed if needed
Start with a narrow, well-defined use case. Expand access only when there is a clear benefit and the governance model is understood.
Important reminder about agentic AI
Important reminder
AI agents can make mistakes.
Even where tools, permissions, prompts, and workflows have been carefully designed, an agent may misunderstand a request, choose the wrong tool, rely on incomplete context, or produce an unexpected result.
Permissions, tool design, audit logging, validation, deterministic workflow checks, and human review can reduce risk, but they cannot remove it entirely.
Use human review where an agent action affects important decisions, external communications, sensitive data, record updates, document generation, or task completion.
Things to remember
- MCP lets approved agents connect to Autologyx through governed tools.
- Most users do not need to learn every tool before using an MCP-enabled agent.
- MCP Work is for operational records, tasks, documents, and process interaction.
- MCP Customer Success is for Autologyx knowledge, configuration guidance, and solution design support.
- Claude CoWorker, OpenAI Web, and other MCP clients may each have slightly different connection flows.
- Co-pilot patterns are usually the best starting point.
- Autonomous patterns need narrower permissions and stronger governance.
- Tool access should be limited to the tools and data the agent genuinely needs.
- Audit logging and human review are essential for higher-risk actions.