5. Monitoring the Status of your DocuSign Envelope
Having created your DocuSign envelope via an API call from Catalyst, the DocuSign application will handle the sending and signing of the document(s) on the basis of the Parameters in that API call.
However, you can use Catalyst to monitor the status of the envelope and use changes in the status to take further actions.
The following steps explain how to set up the API and variable actors needed to capture and monitor this status in the same sequence as where the DocuSign envelope is being created.
Steps
- Capture the envelope ID. Take a trigger from the API call which is creating the DocuSign envelope and connect it to a local variable. The trigger configuration will simply be “When Actor completed". This variable will be used to capture the DocuSign envelope ID. Give it a name in the Variable field and configure it as shown below using
{{output.envelopeId}}as the Value.
Create the status-check API call. Take a trigger from the variable and connect it to a new API actor. Again, the trigger configuration will be “When Actor completed". This API call will be used to get the signing status. It is a GET request using JSON Data. Having selected your DocuSign auth object, give the API call an appropriate name.
Set the URL. The URL is the same as for creating the envelope with the addition of /
{{variables.Variable}}. In this case: https://demo.docusign.net/restapi/v2.1/accounts/3ee6ec79-6dd7-409e-84f0-f8dxxxxxx/envelopes/{{variables.contract_env_id}}
NB: You can right click at the end of the URL field and merge in the correct variable as shown in the screenshots above and below.
- Save and test the API call. As always, you will need to test the call to make it live. When successful, the test log will look similar to the below. Included in the data returned will be the status.
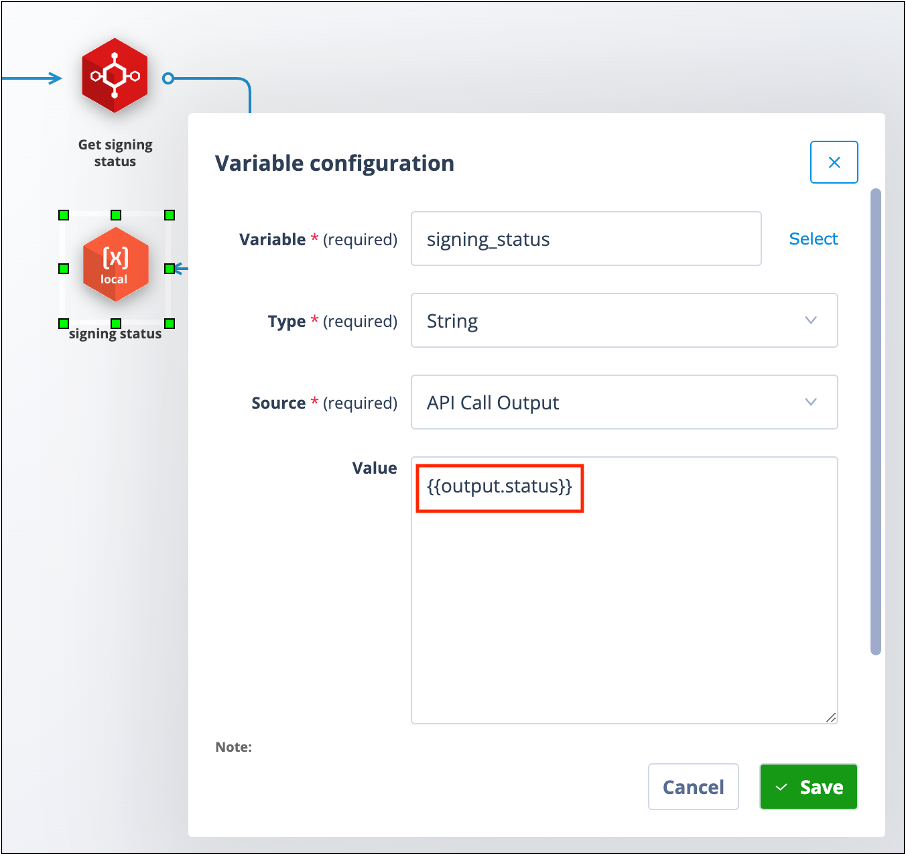
Capture the envelope status. Take a trigger from the API and connect it to another local variable; the trigger configuration will be “When Actor completed". This variable will be used to capture the envelope status.
Configure the status variable. Configure the variable as below using
{{output.status}}as the Value. Save this.
- Loop back to re-check the status. Take a trigger from this variable and loop back to the GET API call. This time the trigger condition will have a delay built in. You need to consider what is an appropriate timescale for the delay because effectively this determines the frequency by which the envelope status will be checked. We have used 4 hours.
- Add supplementary trigger conditions. The trigger will need supplementary conditions as shown below.
Note that these conditions all:
- refer to the value of the variable which holds the envelope status
- are all negative, ie not this value
- all values are in lower case
To clarify: the sequence will now create the DocuSign envelope and capture the envelope ID. The envelope ID is used to get its status. The status is stored and 4 hours later the status is re-checked. The status value will be updated if it has changed. This cycle will repeat every 4 hours until the status is completed, declined or signed.
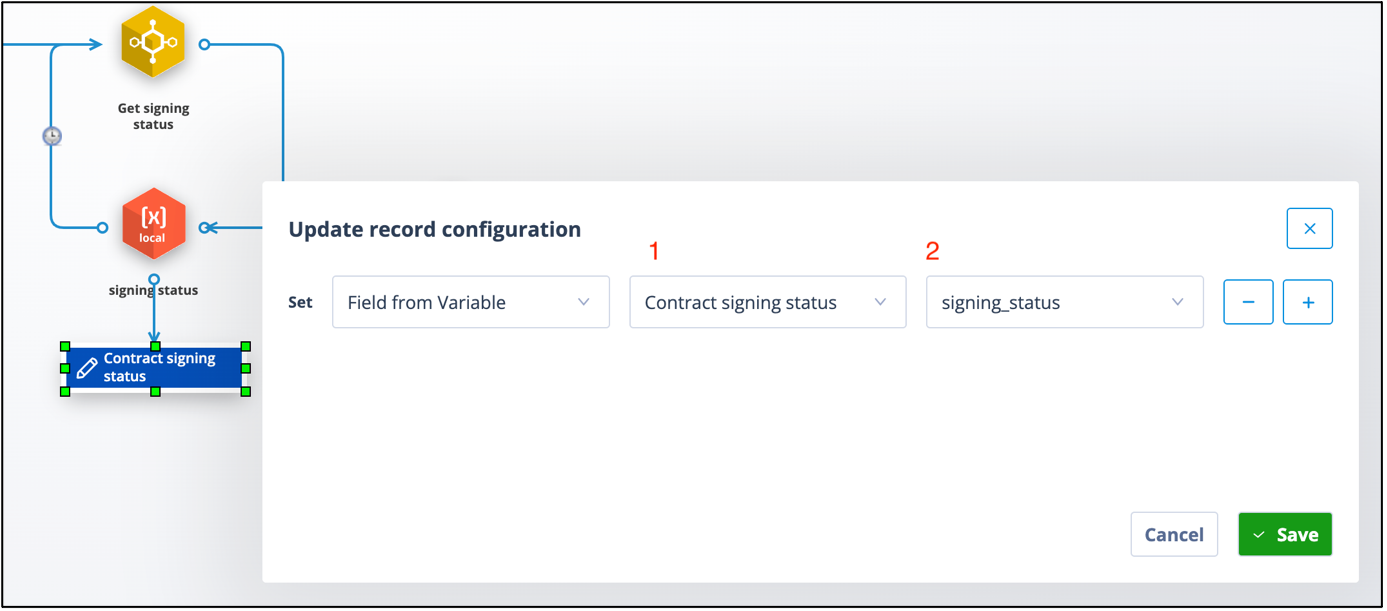
- Optionally update a record field with the status. An update actor can be connected from the envelope status variable in order that the status can be held in a field on the record. This value can then be used:
- as a column header in the records list
- in task templates, document templates, send message actors and subsequent trigger conditions
- in reporting
The below trigger condition shows the field to be updated at 1 and the variable which will populate the field with its value at 2.
Field as a column header below.
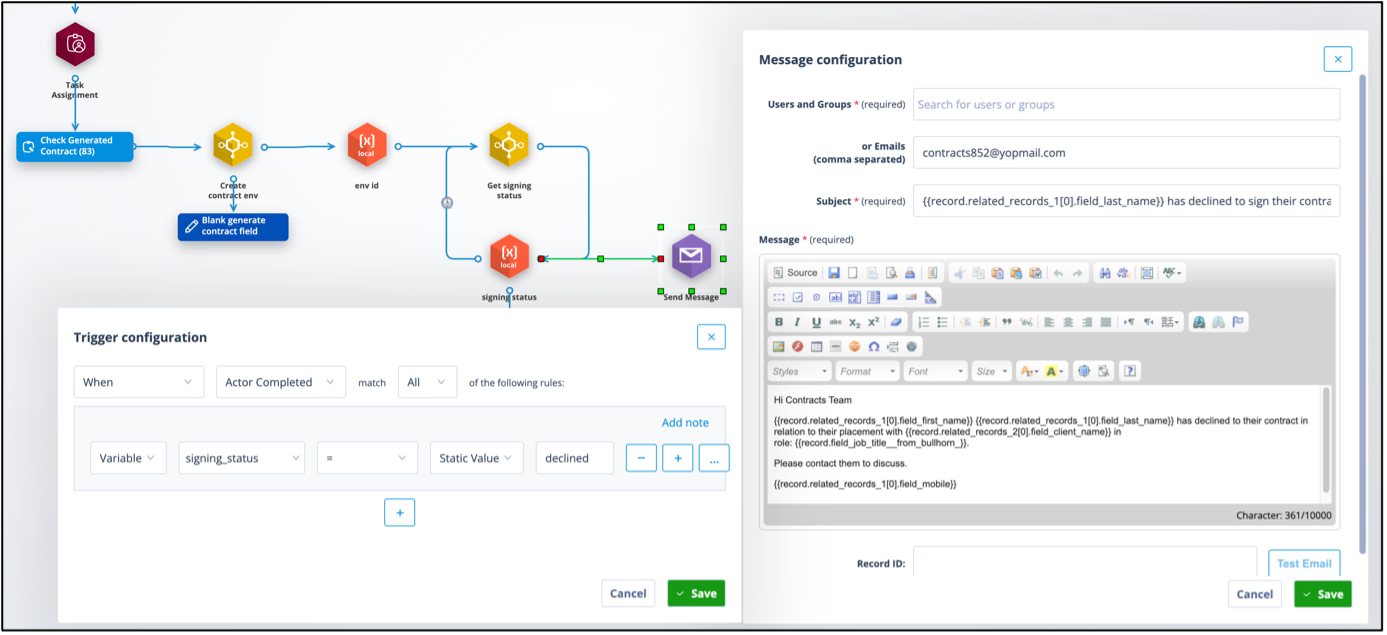
- Optionally send messages based on status changes. A send message actor can also be connected from the signing status variable in order that the status can be used to send messages to individuals or teams as this changes.
The below screenshot shows an email being sent to the contracts team on the basis of the status changing to “declined”.
Remember to save your sequence frequently.